OpenVPN Configuration
MikroTik OpenVPN is an amazing VPN solution. IT provides a secure and encrypted VPN tunnel across public network. Unlike PPTP and L2TP VPN Services which are poorly designed and can easily be blocked, OpenVPN can highly be customized and even can be run on so popular TCP Port 443. So, OpenVPN cannot easily be blocked. OpenVPN uses SSL/TLS Certificates. So, OpenVPN Tunnel is a trusted tunnel to send and receive data across public network. OpenVPN is a site to site VPN technology in nature even in NAT network. But MikroTik OpenVPN has limitation to use PPP username and password although a site to site VPN does not require username and password.
The goal of this article is to configure an OpenVPN Server on so popular TCP Port 443 in MikroTik Router and configure OpenVPN Client in Windows Operating System so that a Windows user can connect to a remote office network and can be able to access remote network resources (Servers, Printers etc.) across public network safely.
Network Diagram
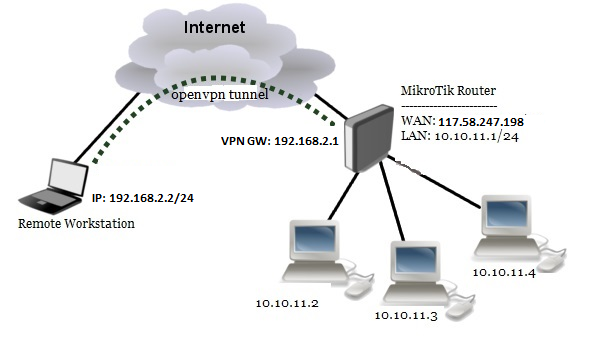
To configure OpenVPN Server in MikroTik Router on TCP Port 443, we are following the below network diagram.
In this network, MikroTik Router (RouterOS v6.46) is connected to internet through ether1 interface having IP address 117.58.247.198/30. In your network, this IP address should be replaced with public IP address. MikroTik Router’s ether2 interface is connected to local network having IP network 10.10.11.0/24. We will configure OpenVPN server in this router and OpenVPN client in a Windows Operating System. After OpenVPN Server and Client configuration, the router will create a virtual interface (OpenVPN Tunnel) across public network where VPN Gateway IP address will be 192.168.2.1 and Client machine will get an IP Address within 192.168.2.0/24 IP Block. We will also declare route in OpenVPN Client so that connected VPN user can access resources of OpenVPN server’s network.
OpenVPN Server and Client Configuration
We will now start OpenVPN Server and Client configuration. Complete OpenVPN configuration can be divided into two parts.
- Part 1: OpenVPN Server Configuration in MikroTik Router
- Part 2: OpenVPN Client Configuration in Windows Operating System
Part 1: OpenVPN Server Configuration in MikroTik Router
According to the network diagram, MikroTik Router is our OpenVPN Server. So, we will enable and configure OpenVPN Server in MikroTik Router. It is assumed that your WAN and LAN networks are working without any issue.
Complete MikroTik OpenVPN Server configuration can be divided into the following three steps.
- Creating TLS Certificate for OpenVPN Server and Client
- Enabling and Configuring OpenVPN Server
- Creating OpenVPN Users
Step 1: Creating TLS Certificate for OpenVPN Server and Client
OpenVPN server and client configuration requires TLS certificate because OpenVPN uses TLS certificate for secure communication. MikroTik RouterOS v6 gives ability to create, store and manage certificates in certificate store. So, we will create required OpenVPN certificate from our RouterOS. OpenVPN Server and Client require three types of certificates:
- CA (Certification Authority) Certificate
- Server Certificate
- Client Certificate
Creating CA certificate
The following steps will show how to create CA certificate in MikroTik RouterOS.
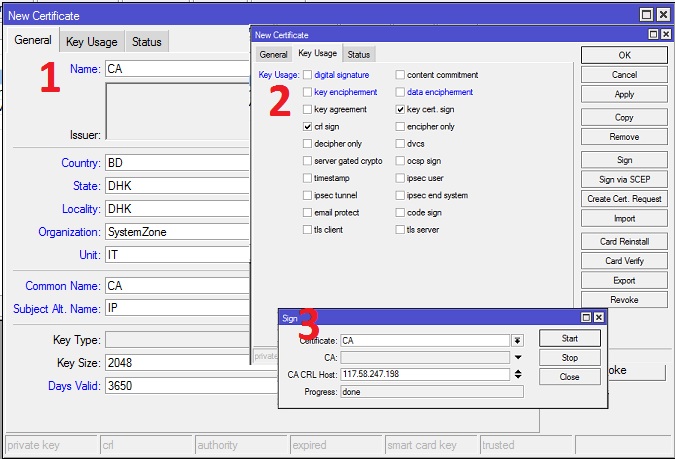
- From Winbox, go to System > Certificates menu item and click on Certificates tab and then click on PLUS SIGN (+). New Certificate window will appear.
- Put your CA certificate name (for example: CA) in Name input field. Also put a certificate common name (for example: CA) in Common Name input field.
- You will find some optional fields in General tab. You can fill those if you wish. All fields are self-defined.
- Click on Key Usage tab and uncheck all checkboxes except crl sign and key cert. sign checkboxes.
- Click on Apply button and then click on Sign button. Sign window will appear now.
- Your created CA certificate template will appear in Certificate dropdown menu. Select your newly created certificate template if it is not selected.
- Put MikroTik Router’s WAN IP address (example: 117.58.247.198) in CA CRL Host input field.
- Click on Sign button. Your Signed certificate will be created within few seconds.
- Click on OK button to close New Certificate window.
- If newly created CA certificate does not show T flag or Trusted property shows no, double click on your CA certificate and click on Trusted checkbox located at the bottom of General tab and then click on Apply and OK button.
CA certificate has been created successfully. Now we will create server certificate.
Creating Server Certificate
The following steps will show how to create server certificate in MikroTik RouterOS.
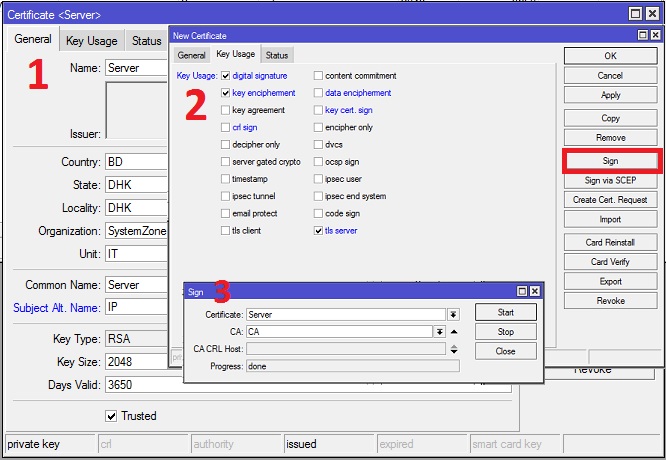
- Click on PLUS SIGN (+) again. New Certificate window will appear.
- Put your server certificate name (for example: Server) in Name input field. Also put a certificate common name (for example: Server) in Common Name input field.
- If you have put any optional field in CA certificate, put them here also.
- Click on Key Usage tab and uncheck all checkboxes except digital signature, key encipherment and tls server checkboxes.
- Click on Apply button and then click on Sign button. Sign window will appear now.
- Your newly created Server certificate template will appear in certificate dropdown menu. Select newly created certificate template if it is not selected.
- Also select CA certificate from CA dropdown menu.
- Click on Sign button. Your Signed certificate will be created within few seconds.
- Click on OK button to close New Certificate window.
- If newly created server certificate does not show T flag or Trusted property shows no, double click on your server certificate and click on Trusted checkbox located at the bottom of General tab and then click on Apply and OK button.
Server certificate has been created successfully. Now we will create client certificate.


